Note
Go to the end to download the full example code.
Linear Selectors#
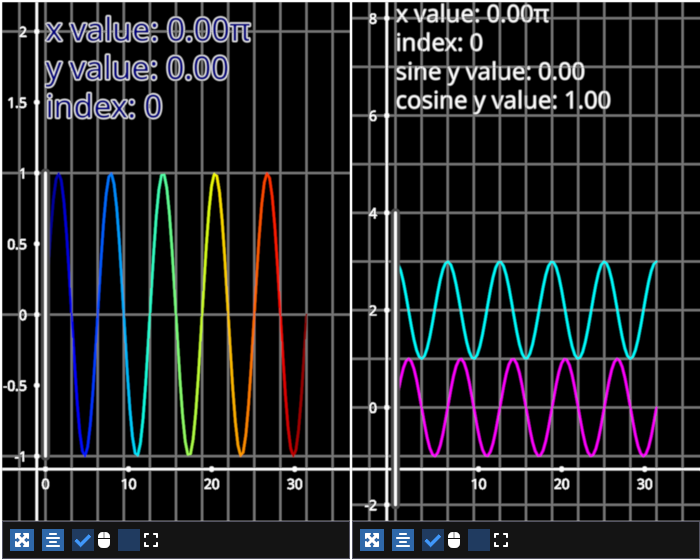
Example showing how to use a LinearSelector with lines and line collections. The linear selector is the yellow vertical line.

/home/runner/work/fastplotlib/fastplotlib/fastplotlib/graphics/features/_base.py:18: UserWarning: casting float64 array to float32
  warn(f"casting {array.dtype} array to float32")
# test_example = true

import fastplotlib as fpl
import numpy as np


# create some data
xs = np.linspace(0, 10 * np.pi, 100)
sine = np.column_stack([xs, np.sin(xs)])
cosine = np.column_stack([xs, np.cos(xs)])

# a varying sine-cosine quilted pattern
image_xs, image_ys = np.meshgrid(xs, xs)
multiplier = np.linspace(0, 10, 100)
image_data = multiplier * np.sin(image_xs) + multiplier * np.cos(image_ys)

# create a figure
figure = fpl.Figure(
    shape=(1, 2),
    size=(700, 560)
)

# line of a single sine wave from 0 - 10π
line = figure[0, 0].add_line(sine, cmap="jet")

# add a linear selector to the line
line_selector = line.add_linear_selector()

line_selector_text = (f"x value: {line_selector.selection / np.pi:.2f}π\n"
                      f"y value: {line.data[0, 1]:.2f}\n"
                      f"index: {line_selector.get_selected_index()}")

# a label that will change to display line data based on the linear selector
line_selection_label = figure[0, 0].add_text(
    line_selector_text,
    offset=(0., 1.75, 0.),
    anchor="middle-left",
    font_size=32,
    face_color=line.colors[0],
    outline_color="w",
    outline_thickness=0.1,
)


# add an event handler using a decorator, selectors are just like other graphics
# you can also use the .add_event_handler() method directly instead of a decorator
# see the line collection example below for a non-decorator example
@line_selector.add_event_handler("selection")
def line_selector_changed(ev):
    selection = ev.info["value"]
    index = ev.get_selected_index()

    # set text to display selection data
    line_selection_label.text = \
        (f"x value: {selection / np.pi:.2f}π\n"
         f"y value: {line.data[index, 1]:.2f}\n"
         f"index: {index}")

    # set text color based on line color at selection index
    line_selection_label.face_color = line.colors[index]


# line stack, sine and cosine wave
line_stack = figure[0, 1].add_line_stack([sine, cosine], colors=["magenta", "cyan"], separation=1)
line_stack_selector = line_stack.add_linear_selector()

line_stack_selector_text = (f"x value: {line_stack_selector.selection / np.pi:.2f}π\n"
                            f"index: {line_selector.get_selected_index()}\n"
                            f"sine y value: {line_stack[0].data[0, 1]:.2f}\n"
                            f"cosine y value: {line_stack[1].data[0, 1]:.2f}\n")

# a label that will change to display line_stack data based on the linear selector
line_stack_selector_label = figure[0, 1].add_text(
    line_stack_selector_text,
    offset=(0., 7.0, 0.),
    anchor="middle-left",
    font_size=24,
    face_color="w",
)


def line_stack_selector_changed(ev):
    selection = ev.info["value"]

    # a linear selectors one a line collection returns a
    # list of selected indices for each graphic in the collection
    index = ev.get_selected_index()[0]

    # set text to display selection data
    line_stack_selector_label.text = \
        (f"x value: {selection / np.pi:.2f}π\n"
         f"index: {index}\n"
         f"sine y value: {line_stack[0].data[index, 1]:.2f}\n"
         f"cosine y value: {line_stack[1].data[index, 1]:.2f}\n")


# add an event handler, you can also use a decorator
line_stack_selector.add_event_handler(line_stack_selector_changed, "selection")

# some axes and camera zoom settings
for subplot in [figure[0, 0], figure[0, 1]]:
    subplot.axes.grids.xy.visible = True
    subplot.axes.auto_grid = False
    subplot.axes.grids.xy.major_step = (np.pi, 1)
    subplot.axes.grids.xy.minor_step = (0, 0)


figure.show(maintain_aspect=False)

# NOTE: fpl.loop.run() should not be used for interactive sessions
# See the "JupyterLab and IPython" section in the user guide
if __name__ == "__main__":
    print(__doc__)
    fpl.loop.run()
Total running time of the script: (0 minutes 0.578 seconds)
